 QiMeal
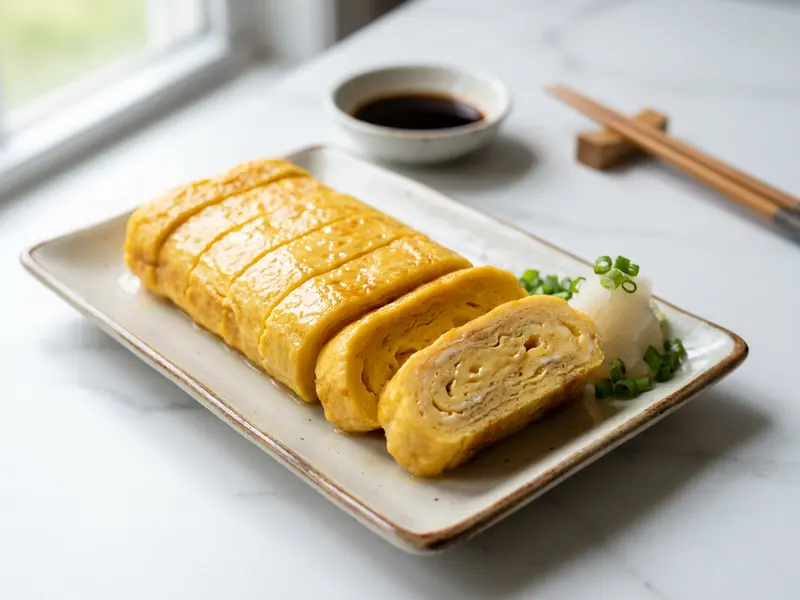
Japanese Tamagoyaki
Japanese Tamagoyaki · ready in 23 min · 2 servings · 218 kcal per serving · medium · 6 ingredients
A glossy Japanese breakfast classic with tender layers, gentle dashi savor, and a quiet mirin sweetness that makes each slice feel silky and precise.
- Prep
- 6 min
- Cook
- 17 min
- Total
- 23 min
- Serves
- 2
- kcal
- 218
- Difficulty
- medium
Ingredients · 2 servings
- 5Egg, beaten
- 60 mlDashi
- 2 tspSoy sauce
- 1 tbspMirin
- 1 ½ tspSugar
- 1 pinchSalt
Equipment
stovetop, bowl, chopsticks, sieve, measuring spoons, measuring cup, nonstick rectangular pan, spoon, spatula, plate, knife
Instructions
- Mise En Place
Gather and measure all ingredients, then set out a bowl, chopsticks, sieve, measuring spoons, nonstick rectangular pan, spatula, and plate. · 2 min
What to look for: All ingredients are measured and tools are within reach.
- Mix Egg Base
Beat eggs gently in the bowl, then stir in dashi, soy sauce, mirin, sugar, and salt until the whites are loosened but not foamy. · 3 min
What to look for: The mixture is even yellow with only a few small strands of egg white.
- Strain Mixture
Strain the egg mixture through the sieve into a cup with a spout for a smoother texture and easier thin pouring. · 1 min
What to look for: The strained mixture looks smooth and pourable.
- Warm Pan
Heat the nonstick pan over medium low heat until a small spoonful of egg sets at the edges in about 3 seconds. · 2 min
What to look for: A test drop sets softly without browning.
- Set First Layer
Pour in a thin layer of egg, tilt to cover the pan, and cook until the surface is mostly set but still glossy. · 2 min
What to look for: The egg sheet is pale yellow, glossy, and just firm enough to move.
- Roll First Sheet
Roll the sheet toward you with the spatula, keep the seam tucked, then slide the roll to the far side of the pan. · 2 min
What to look for: The first roll is compact and still lightly moist on the surface.
- Build More Layers
Pour in another thin layer, lift the roll so liquid flows underneath, cook until glossy, then roll it around the first layer. · 5 min
What to look for: Each new layer wraps neatly around the previous roll.
- Finish Omelette
Repeat pouring and rolling until all mixture is used, shaping the roll gently against the pan sides as the layers set. · 3 min
What to look for: The omelette is rectangular, pale golden, and springy when nudged.
- Rest And Slice
Transfer the roll to a plate, rest for 2 minutes, then slice crosswise into even pieces while the layers hold their shape. · 2 min
What to look for: The slices show clear, soft layers without liquid egg running out.
- Serve Warm
Serve the tamagoyaki warm or at room temperature, with the cut faces visible to show the tender layered interior. · 1 min
What to look for: The slices are glossy, neat, and softly set.
Nutrition (per serving)
| kcal | 218 |
|---|---|
| Protein | 16 g |
| Carbohydrates | 8 g |
| of which sugars | 7 g |
| Fat | 12 g |
| of which saturated | 4 g |
| Fibre | 0 g |
| Sodium | 697 mg |
Nutri-ScoreC
Allergens
Contains: eggs, fish, soybeans, gluten, soy
Storage and reheating
- Fridge: up to 3 days
- Freezer: yes, up to 1 months
- Reheat gently in short microwave bursts until warm, not hot, to protect the layered texture.
Ingredient substitutions
Egg
- Fresh egg: Use another large egg of the same size for consistent layers.
Dashi
- Water: Use only if dashi is unavailable, because the omelette will lose much of its savory depth.
Soy sauce
- Salt: Use only enough to season, but color and fermented aroma will be reduced.
Mirin
- Sugar: Dissolve in dashi to keep the mixture smooth, though rice wine aroma is reduced.
Sugar
- Honey: Use a small amount and mix thoroughly, because honey adds a rounder floral sweetness.
Salt
- Soy sauce: Use sparingly because soy sauce adds liquid and a darker color.